In this post, we're going to see how to create app icons for React native apps for iOS and Android.
- Have your logo and icon ready and use one of these tools to generate the icons that'll be used for iOS and Android
- For Android, navigate to the following directory of your app
android/app/src/main/rescopy and replace the following folders from your generated icons- mipmap-hdpi
- mipmap-mdpi
- mipmap-xhdpi
- mipmap-xxhdpi
- mipmap-xxxhdpi
- In your
AndroidManifest.xmlfile removeic_launcher_roundif this image was not generated, once this is done rebuild your Android app and your icon should be available
- For iOS, open your iOS project on Xcode, navigate to
{AppName}/{AppName}/Images/AppIcon, then replace/copy all the your generated icons into the right AppIcon. Rebuild your app and your icon should now be available.
For splash screen, please follow the documentation below
- Create an image to use as your splash screen with the following dimensions 4096 * 4096
- Using this tool to generate the splash screen recommended for iOS and Android https://apetools.webprofusion.com/
- Upload your image and generate assets for both iOS and Android.
- Using the following package, follow the installation instructions in the link or below
npm i react-native-splash-screen --save
- In your
android/settings.gradlefile, make the following additions:
include ':react-native-splash-screen' project(':react-native-splash-screen').projectDir = new File(rootProject.projectDir, '../node_modules/react-native-splash-screen/android')- In your android/app/build.gradle file, add the
:react-native-splash-screenproject as a compile-time dependency:
... dependencies { ... implementation project(':react-native-splash-screen') }- Update the
MainActivity.javato usereact-native-splash-screenvia the following changes:
import android.os.Bundle; import com.facebook.react.ReactActivity; import org.devio.rn.splashscreen.SplashScreen; public class MainActivity extends ReactActivity { @Override protected void onCreate(Bundle savedInstanceState) { SplashScreen.show(this); super.onCreate(savedInstanceState); } // ...other code }- Create a
launch_screen.xmlfile inapp/src/main/res/layoutand add the following changes:
<?xml version="1.0" encoding="utf-8"?> <RelativeLayout xmlns:android="http://schemas.android.com/apk/res/android" android:orientation="vertical" android:layout_width="match_parent" android:layout_height="match_parent"> <ImageView android:layout_width="match_parent" android:layout_height="match_parent" android:src="@drawable/screen" android:scaleType="centerCrop" /> </RelativeLayout>- Copy your downloaded splash screen and copy the Android files into your
android/app/src/main/resfolder
- Remove/comment out this line in
android/app/src/main/res/values/styles.xml
<item name="android:editTextBackground">@drawable/rn_edit_text_material</item>- For iOS run
pod installto install pods
- Add this to your
AppDelegate.mmfile
#import "AppDelegate.h" #import <React/RCTBundleURLProvider.h> #import "RNSplashScreen.h" @implementation AppDelegate - (BOOL)application:(UIApplication *)application didFinishLaunchingWithOptions:(NSDictionary *)launchOptions { // ...other code [super application:application didFinishLaunchingWithOptions:launchOptions]; [RNSplashScreen show]; return YES; }- Open your iOS project on Xcode, navigate to
{AppName}/{AppName}/Images, add a new ImageSet called LaunchImage and copy your downloaded assets into the respective places below- LaunchImage.png → 1x
- LaunchImage 320x480.png → 2x
- LaunchImage 650x960.png → 3x
- Navigate to
{AppName}/{AppName}/LaunchScreenin Xcode under theViewControllerdelete the following default texts for AppName and “Powered by React Native”
- Click on the Safe Area, then on your top navigator where File, Edit, Editor etc are located and click on View and click on Show Library, search for Image View and drag into your story board

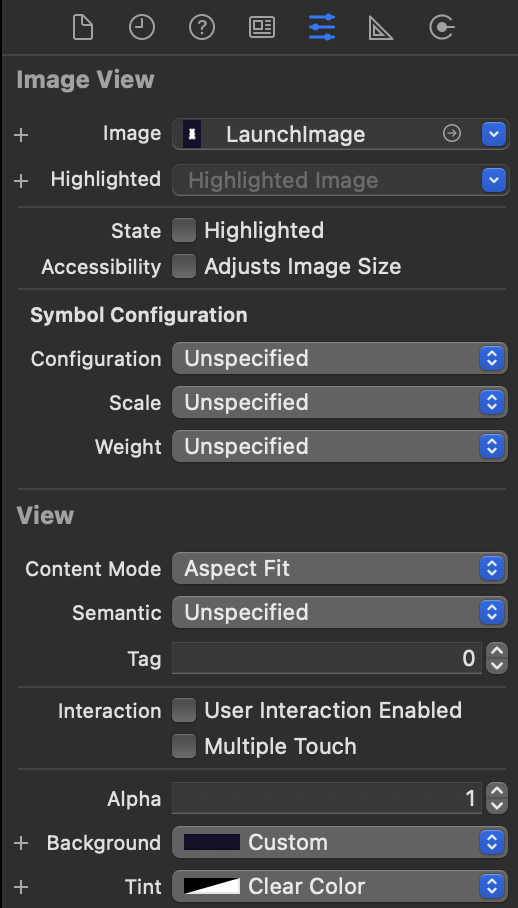
- Attach LaunchImage into this image view as using the side navigation as shown below

- Go to the size inspector and set “Arrange” to “Fill Container Horizontally” and “Fill Container Vertically”, enable “Auto Resizing”

- Go back to the attribute inspector and make sure the “Content Mode” is “Aspect fit” inside the View
- If your LaunchScreen has a background colour you can set the background colour of the LaunchScreen to match the colour of your Image